Introduction
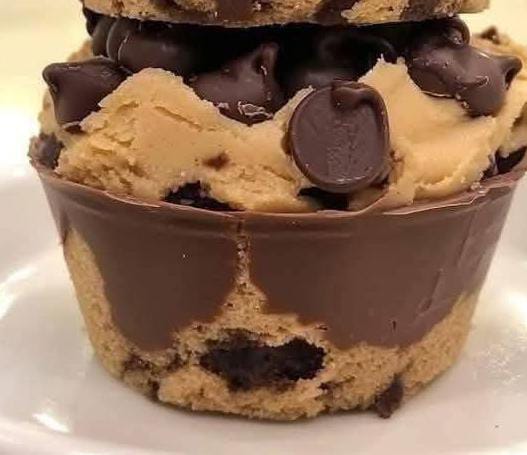
If you’re a fan of the classic peanut butter and chocolate combination, then these Peanut Butter Chocolate Chip Cookie Cups are about to become your new favorite dessert. Imagine chewy chocolate chip cookies shaped into bite-sized cups, filled with a creamy, sweet peanut butter center, and topped with melty chocolate chips. It’s a perfect balance of textures and flavors, bringing together buttery, chocolatey, and nutty goodness in every bite.
These cookie cups are great for parties, bake sales, holiday gatherings, or just satisfying your sweet tooth. They are easy to make, fun to eat, and guaranteed to be a crowd-pleaser. In this article, we’ll dive into the history of peanut butter desserts, variations to try, expert baking tips, and perfect pairings to take your cookie cups to the next level.
-The History of Peanut Butter in Desserts
Peanut butter has long been a staple in American cuisine, but its journey into desserts is particularly fascinating. The origins of peanut butter date back to the late 1800s, when Dr. John Harvey Kellogg developed it as a protein-rich food alternative for patients. However, it wasn’t until the early 20th century that peanut butter became a popular ingredient in baking.
By the 1920s and 1930s, peanut butter cookies became a household favorite, with the classic fork-pressed design making its debut in the 1930s Pillsbury cookbook. Over time, peanut butter was paired with chocolate chips, fudge, and other rich ingredients, giving birth to the now-iconic peanut butter and chocolate combination.
Fast forward to today, and this timeless pairing has evolved into countless desserts, including Peanut Butter Cups, Peanut Butter Brownies, and now, Peanut Butter Chocolate Chip Cookie Cups.
-Why You’ll Love These Cookie Cups
Easy to Make – No rolling or shaping dough—just scoop, bake, and fill.
Perfectly Portioned – Each cookie cup is the ideal bite-sized treat.
Irresistible Flavor Combination – Chocolate and peanut butter never disappoint.
Soft, Chewy, and Creamy Texture – A delightful mix of textures in every bite.
Great for Any Occasion – Whether for birthdays, holidays, or a casual treat, these cookie cups shine.
-Ingredients & Substitutions
For the Cookie Dough:
1 1/4 cups all-purpose flour – The foundation of the cookie, giving it structure.
1/2 teaspoon baking soda – Helps the cookies rise and stay soft.
1/4 teaspoon salt – Enhances all the flavors.
1/2 cup unsalted butter, softened – Provides a rich, buttery texture.
1/2 cup brown sugar – Adds moisture and a hint of caramel flavor.
1/4 cup granulated sugar – Balances the sweetness.
1 teaspoon vanilla extract – Enhances the overall flavor.
1 egg – Helps bind everything together.
1 cup chocolate chips (divided) – Half will go into the dough, and the rest will be used for topping.
For the Peanut Butter Filling:
1/2 cup creamy peanut butter – The star of the filling.
1/4 cup powdered sugar – Sweetens and thickens the peanut butter filling.
Optional Garnishes:
Melted chocolate drizzle
Chopped peanuts for a crunchy finish
A sprinkle of sea salt for a gourmet touch
-Step-by-Step Directions
Step 1: Preheat the Oven & Prep Your Muffin Tin
Preheat your oven to 350°F (175°C).
Lightly grease a muffin tin with non-stick spray to prevent sticking.
Step 2: Make the Cookie Dough
In a medium bowl, whisk together flour, baking soda, and salt. Set aside.
In a large bowl, beat softened butter, brown sugar, and granulated sugar until creamy.
Add in vanilla extract and egg, mixing until fully combined.
Gradually fold in the dry ingredients until just combined.
Stir in ½ cup of chocolate chips.
Step 3: Scoop & Bake
Scoop about 1.5 tablespoons of dough into each muffin tin, filling about 2/3 full.
Press down lightly to create a flat surface.
Bake for 10-12 minutes, or until golden brown on the edges.
Remove from the oven and let cool for 5 minutes.
Step 4: Create the Indentation for the Filling
Using the back of a small spoon or your thumb, gently press down into the center of each cookie cup to create a small well for the peanut butter filling.
Let the cookie cups cool completely before filling.
Step 5: Make the Peanut Butter Filling
In a small bowl, mix together creamy peanut butter and powdered sugar until smooth.
If the mixture is too thick, warm it slightly in the microwave for 10-15 seconds.
Step 6: Fill & Top the Cookie Cups
Spoon a generous dollop of peanut butter filling into the center of each cookie cup.
Sprinkle the remaining chocolate chips over the peanut butter.
Optional: Melt extra chocolate chips and drizzle over the top for a beautiful finish.
Step 7: Serve & Enjoy!
Allow the chocolate topping to set before serving.
Enjoy with a glass of cold milk, hot coffee, or a scoop of vanilla ice cream.
-Delicious Variations
Want to get creative? Here are some fun variations of this recipe:
1. Nutella-Stuffed Cookie Cups
Swap out the peanut butter filling for Nutella for a rich, hazelnut twist.
2. Salted Caramel Peanut Butter Cups
Drizzle warm caramel sauce on top and sprinkle with sea salt.
3. Reese’s-Inspired Cups
Place a mini Reese’s Peanut Butter Cup inside each cookie cup before baking.
4. Dark Chocolate Lovers’ Edition
Use dark chocolate chips instead of semi-sweet for a deeper flavor.
5. Crunchy Peanut Butter Cups
Use crunchy peanut butter instead of creamy for added texture.
-Pro Baking Tips for the Best Cookie Cups
Chill the dough for 15 minutes before baking for a slightly thicker cookie.
Don’t overbake! The cookies will continue to set as they cool.
Use a silicone muffin pan for easy removal.
Make ahead: Store unfilled cookie cups in an airtight container for up to 3 days, then fill before serving.
-Pairing Ideas
Looking to elevate your dessert experience? Try pairing these cookie cups with:
Hot Beverages: Espresso, cappuccino, or a chai latte.
Cold Beverages: Iced coffee, milkshakes, or almond milk.
Desserts: Serve with a scoop of vanilla ice cream or chocolate mousse.
-Frequently Asked Questions
1. Can I make these gluten-free?
Yes! Substitute 1:1 gluten-free flour for the all-purpose flour.
2. How should I store leftovers?
Store in an airtight container at room temperature for 3 days or in the refrigerator for up to a week.
3. Can I freeze these cookie cups?
Absolutely! Freeze in a single layer for up to 3 months, then thaw before serving.
-Final Thoughts
These Peanut Butter Chocolate Chip Cookie Cups are the ultimate treat for anyone who loves the combination of chocolate and peanut butter. With their soft, chewy cookie base, creamy peanut butter filling, and melty chocolate topping, they’re bound to disappear fast!
Whether you’re making them for a special occasion or just a weekend baking project, these cookie cups are easy, delicious, and totally addictive.
Try them out and let us know—what’s your favorite twist on this recipe? Happy baking!