Introduction
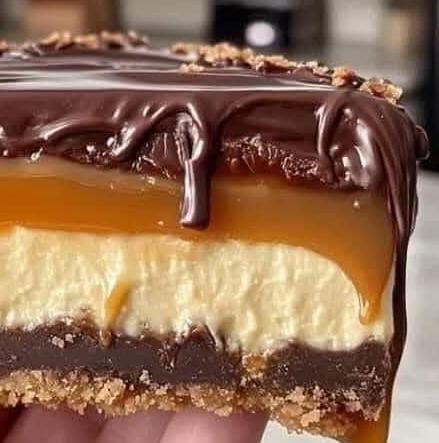
This Homemade No-Bake Twix Cheesecake is a dessert masterpiece inspired by the iconic candy bar. Combining layers of buttery graham cracker crust, smooth caramel, rich chocolate, and creamy cheesecake filling, this no-bake dessert is as indulgent as it is easy to prepare. Perfect for celebrations, potlucks, or a sweet treat for yourself, this cheesecake offers the ultimate balance of flavor and texture without needing an oven.
This extended guide will explore the origins of Twix, the art of no-bake desserts, variations, expert tips, and the detailed recipe to help you craft this show-stopping treat.
-The Origin of Twix and Its Inspiration
The Twix candy bar, known for its signature combination of shortbread, caramel, and milk chocolate, first hit the market in the UK in 1967 before gaining popularity worldwide. The balance of crunchy, creamy, and sweet elements makes it a favorite for dessert lovers everywhere. This no-bake cheesecake captures the essence of Twix while elevating it into a decadent dessert.
-Why Choose a No-Bake Cheesecake?
No-bake cheesecakes are a game-changer for several reasons:
1. Convenience: No oven required, making it perfect for hot days or when you want to avoid baking.
2. Foolproof: It’s easier to achieve a creamy texture without worrying about cracks or overcooking.
3. Customizable: From the crust to the toppings, you can tailor a no-bake cheesecake to suit your taste.
-Ingredients Breakdown and Their Purpose
Graham Cracker Crumbs: Form the base of the crust, providing a sturdy and buttery foundation.
Melted Butter: Binds the crumbs together and enhances the flavor of the crust.
Chocolate Chips: Create a rich chocolate layer reminiscent of Twix’s chocolate coating.
Heavy Cream: Adds creaminess and helps achieve a silky chocolate ganache.
Cream Cheese: The star ingredient for the cheesecake filling, delivering creaminess and tanginess.
Powdered Sugar: Sweetens the cheesecake filling without the graininess of granulated sugar.
Vanilla Extract: Enhances the overall flavor of the filling.
Caramel Sauce: A key element inspired by the caramel layer in Twix, adding gooey sweetness.
Whipped Cream: Lightens the cheesecake filling, creating an airy texture.
-Step-by-Step Recipe: Homemade No-Bake Twix Cheesecake
Ingredients
2 cups graham cracker crumbs
1/2 cup melted butter
1 cup chocolate chips
1/2 cup heavy cream
2 cups cream cheese, softened
1/2 cup powdered sugar
1 tsp vanilla extract
1 cup caramel sauce
1 cup whipped cream
-Preparation Steps
Step 1: Make the Crust
1. In a mixing bowl, combine the graham cracker crumbs and melted butter until fully mixed.
2. Press the mixture firmly into the bottom of a springform pan to create the crust layer.
3. Refrigerate for 10 minutes to set.
Step 2: Prepare the Chocolate Layer
1. In a microwave-safe bowl, combine the chocolate chips and heavy cream.
2. Microwave in 20-second intervals, stirring between each interval, until the mixture is smooth and glossy.
3. Pour the chocolate mixture over the chilled crust and spread evenly.
4. Refrigerate for 15–20 minutes until the chocolate firms up.
Step 3: Make the Cheesecake Filling
1. In a large mixing bowl, beat the softened cream cheese, powdered sugar, and vanilla extract until smooth and creamy.
2. Gently fold in the whipped cream to add lightness and a mousse-like texture.
Step 4: Assemble the Layers
1. Spoon the cheesecake filling over the firm chocolate layer, spreading it evenly with a spatula.
2. Pour the caramel sauce on top, smoothing it out gently.
Step 5: Add the Final Chocolate Drizzle
1. Melt additional chocolate chips with a splash of heavy cream, if desired.
2. Drizzle over the caramel layer, letting some chocolate drip down the sides for a dramatic effect.
Step 6: Chill and Serve
1. Refrigerate the cheesecake for at least 4 hours, or until fully set.
2. Before serving, carefully remove the springform pan and slice using a knife warmed in hot water for clean cuts.
-Expert Tips for Success
1. Softened Cream Cheese: Make sure the cream cheese is at room temperature to avoid lumps in the filling.
2. Chilling is Key: Allow each layer to chill properly to ensure clean, defined layers in the final cheesecake.
3. Use Quality Ingredients: High-quality caramel sauce and chocolate chips elevate the overall taste.
4. Garnish: Add crushed Twix pieces or extra caramel drizzle on top for a show-stopping finish.
-Creative Variations
1. Peanut Butter Twix Cheesecake: Add a layer of peanut butter between the crust and chocolate for a nutty twist.
2. Salted Caramel Cheesecake: Sprinkle sea salt over the caramel layer for a sweet and salty combination.
3. Mini Cheesecakes: Use a muffin tin to create individual portions.
4. Cookie Crust: Replace graham cracker crumbs with crushed chocolate cookies for a richer base.
-The Art of Presentation
Presentation is key when serving a no-bake cheesecake. Consider the following tips:
Plate with Style: Drizzle caramel or chocolate sauce on the plate before placing a slice.
Garnish: Add a dollop of whipped cream, a sprinkle of graham cracker crumbs, or a piece of Twix on top.
Serving Temperature: Serve slightly chilled but not ice-cold for the best texture.
-The Backstory: Why Twix Cheesecake?
The idea of transforming Twix into a no-bake cheesecake is rooted in the desire to bring familiar candy bar flavors into a more decadent dessert. This recipe celebrates the nostalgia of Twix while showcasing the versatility of no-bake cheesecakes. It’s a dessert that feels luxurious yet approachable.
-Nutritional Information (Per Serving)
Calories: ~450 kcal
Carbohydrates: 38g
Protein: 6g
Fat: 30g
Fiber: 1g
-Conclusion
This Homemade No-Bake Twix Cheesecake is a dessert that delivers indulgence in every bite. With its buttery crust, rich chocolate layer, creamy filling, and gooey caramel topping, it’s a treat that’s sure to impress. Whether you’re a Twix fan or a cheesecake lover, this recipe brings the best of both worlds together.
Prepare this dessert for your next gathering or special occasion, and watch it become the star of the table. It’s the perfect balance of elegance and ease, proving that you don’t need an oven to create something spectacular.
Prep Time: 20 minutes
Chill Time: 4 hours
Total Time: 4 hours 20 minutes
Servings: 8–10
Enjoy this no-bake masterpiece, and let the layers of flavor speak for themselves!